Overview
PebblePad allows you to create workbooks or e-portfolios for the students so they can shape and develop their skill sets, while PebblePad (ATLAS) is developed as an institutional space to support learning activities such as PebblePad resources which are organised into workspaces.
With the logs and reports, you can check the history of the actions that were made within a workspace, and also, you can generate reports about the student submissions.
In this article, we will show how to manage logs and reports in a PebblePad (ATLAS) workspace.
How to manage logs and reports in a PebblePad (ATLAS) workspace
Logs in a PebblePad (ATLAS) workspace
To manage logs in a PebblePad (ATLAS) workspace, please follow the steps below:
- Sign in to your Moodle account.
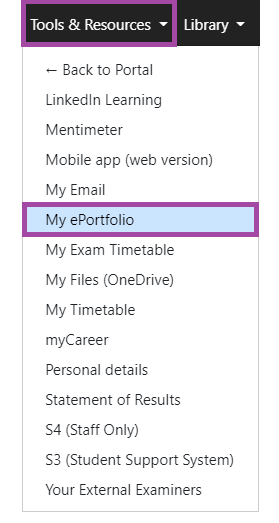
- You will see a navigation bar appearing on the top left side of the screen. Click on ‘Tools and Resources’ and then select ‘My e-portfolio’ from the drop-down menu.
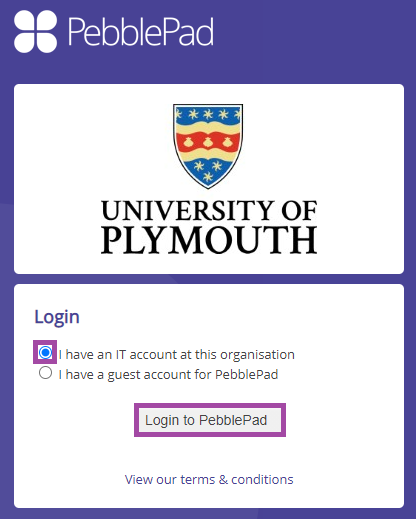
- You will be directed to the PebblePad website where you need to log in with your academic IT account.
- You will see a navigation bar appearing on the top left side of your screen. Click on the blue ball icon to be directed to PebblePad (ATLAS).

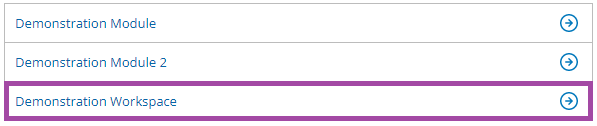
- Once you are in there, you will see the list of the workspaces you are attached to. Please select one where you would like to access and manage the logs and reports.
- Please click on the ‘Management’ menu and then select the ‘Logs’ sub-menu in the navigation bar.

- A new page will open where you can find the logs of the previous actions you, other tutors and students have done in the workspace. Please keep in mind that it is not going to be as detailed as the logs in the DLE as some of them will be restricted, hidden from you.
You would be able to see the following columns:
- ‘Generator’ – this is the column where the users would be listed who have taken the actions.
- ‘Information’ – this is the column where the actions would be listed.
- ‘Go to’ – this is the column where the locations would be listed where the actions have taken place.
- ‘Generated’ – this is the column where the dates would be listed when the actions have taken place.

Reports in a PebblePad (ATLAS) workspace
To manage reports in a PebblePad (ATLAS) workspace, please follow the steps below:
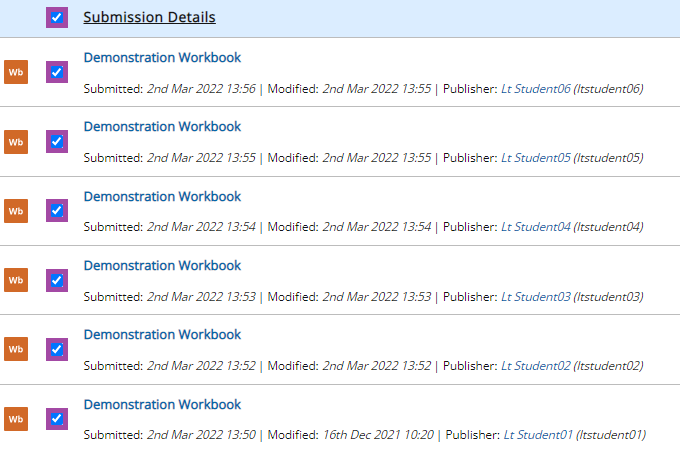
- After you have logged in to PebblePad (ATLAS) and selected a specific workspace, please click on the ‘Submissions’ menu in the navigation bar.

- A new page will open with the list of student submissions. Please select at least one of them or all of them to be able to view the generated reports. Please read the following article if you would like to know more about how to manage submissions within a workspace. (JAMIE: Could you please attach the article ‘Managing submissions in a PebblePad (ATLAS) workspace’ to this article on the words ‘following article’? Thank you! 😊)
- Once you have selected one or multiple student submissions, please click on the ‘Report’ button which appears in the following sub-navigation bar.

- A drop-down list will pop up with the following options:
- ‘Feedback templates’ – with this option, you can view the feedback template responses in case they were added to a workbook. You can get more information about them in the following article.
- ‘Digital signatures’ – with this option, you can view the digital signatures that were added to a workbook by the students.
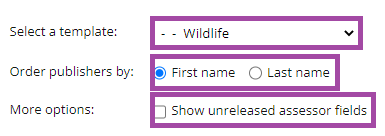
- ‘Workbook page’ – with this option, you can generate a report about individual pages of a workbook in terms of the student responses. You would need to define the following settings: ‘Select a template’ – with this setting, you can define the individual page by selecting one of them from the drop-down list.
- ‘Order publishers by’ – with this setting, you can define whether the order of the student submissions should be based on their first or last names.
- ‘More options: Show unreleased assessor fields’ – with this setting, you can include the assessor fields in the generated report.
- Once you have defined the settings, the report is going to be generated where you would be able to see two tabs with the following information:
- ‘Overview’ – this is the place where you can see the statistics about the student responses which can be also broken down into individual responses.
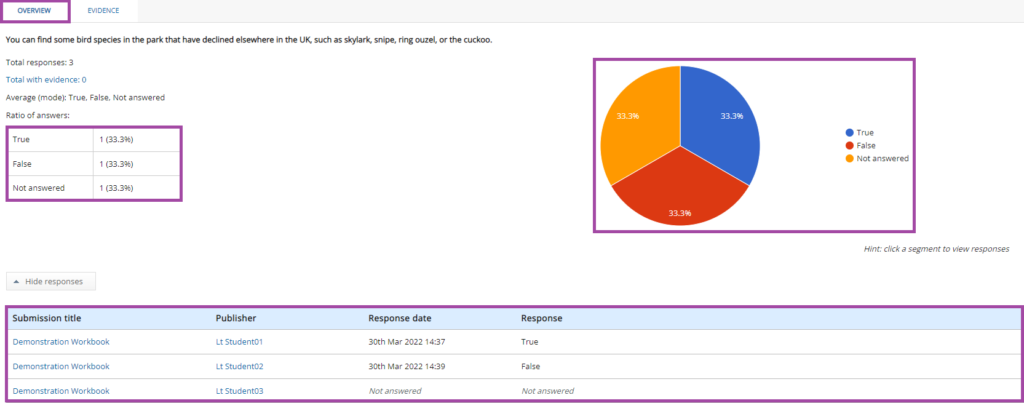
- ‘Evidence’ – this is the place where you can see the attached files (evidence) if the students were asked to do so.

Report options continued:
- ‘Activity logs’ – with this setting, you can get an overview of the time and points accumulated in the ‘Activity Logs’. You can get more information about it in the following article.
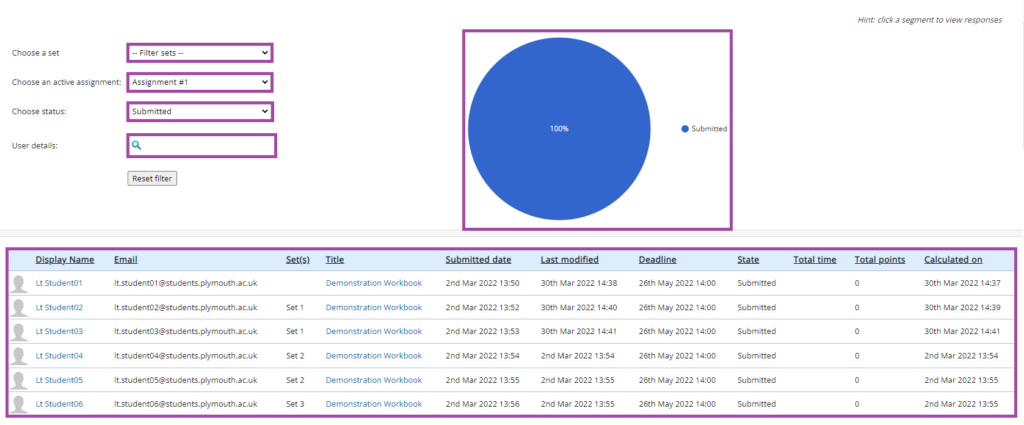
- ‘Breakdown of submissions’ – with this setting, you can view the breakdown of the student submissions in terms of sets, assignments, status, or user names.
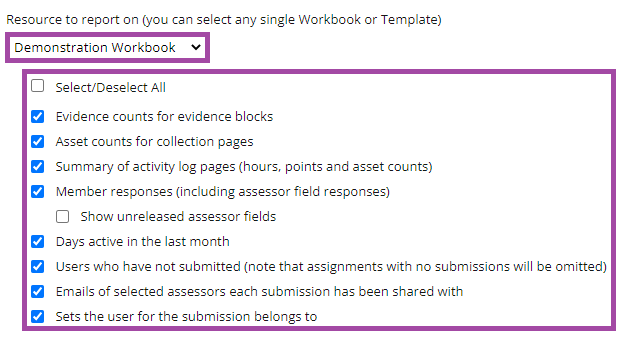
- ‘Workbook CSV’ – with this setting, you can export the student submissions as an Excel spreadsheet (’CSV’). You would need to determine the exact assignment and the additional information you would like to be added to the report (table), such as:
- the number of the evidence attached to the workbook,
- the number of the assets attached to the workbook,
- the student responses (including the assessor fields),
- the active days of the students when they worked on the workbook in the last month,
- the students who have not submitted the workbook,
- the names of the selected assessors for each submission, and
- the sets where the students are allocated to.
Please note that you will be notified via e-mail when the file is ready to be downloaded, before which you would need to enter the given password on the PebblePad website which is also going to be attached into the e-mail.