Overview
PebblePad allows you to create workbooks or e-portfolios for the students so they can shape and develop their skill sets, while PebblePad (ATLAS) is developed as an institutional space to support learning activities such as PebblePad resources which are organised into workspaces.
In this article, we will show how to manage a student submission in a PebblePad (ATLAS) workspace.
How to manage a student submission in a PebblePad (ATLAS) workspace
How to access a student submission
To access a student submission in a PebblePad (ATLAS) workspace, please follow the steps below:
- Sign in to your Moodle account.
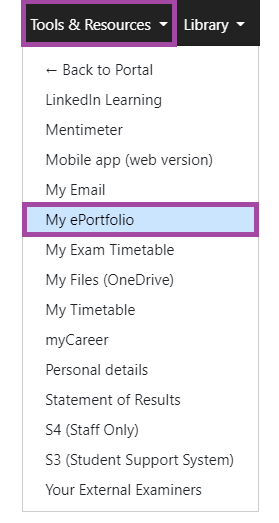
- You will see a navigation bar appearing on the top left side of the screen. Click on ‘Tools and Resources’ and then select ‘My e-portfolio’ from the drop-down menu.
- You will be directed to the PebblePad website where you need to log in with your academic IT account.

- You will see a navigation bar appearing on the top left side of your screen. Click on the blue ball icon to be directed to PebblePad (ATLAS).

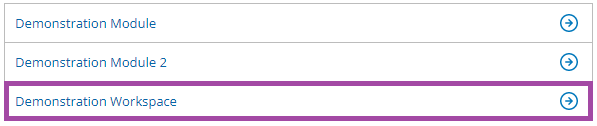
- Once you are in there, you would see the list of the workspaces you are attached to. Please select one where you would like to access and manage the student submissions.
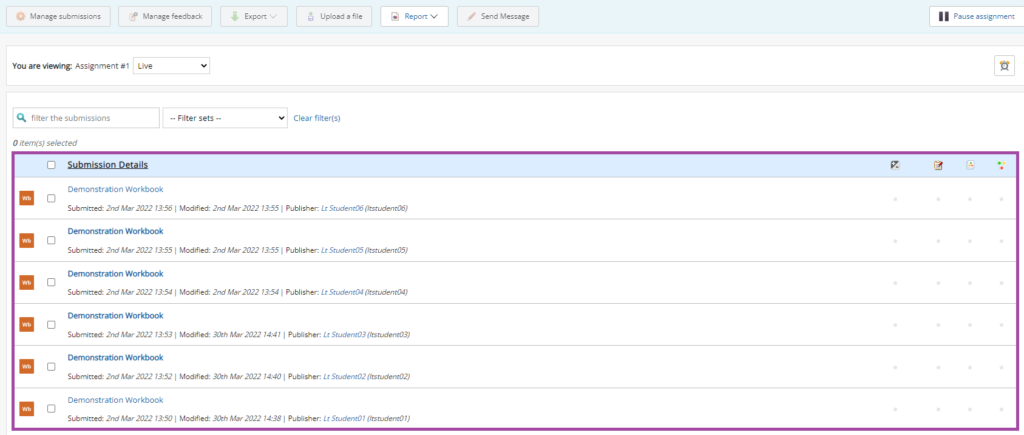
- Once you are in the workspace, please click on the ‘Submissions’ menu in the navigation bar.

- A new page will open with the list of student submissions.
How to add feedback to a student submission
To add feedback to a student submission, please follow the steps below:
- Once you have the list of the student submissions, you would need to open each of them, one by one by clicking on their title to be able to check and/or add feedback to a workbook.
- Once you are within a workbook, you would see the following options listed in a blue feedback toolbar on the top right side of the screen.


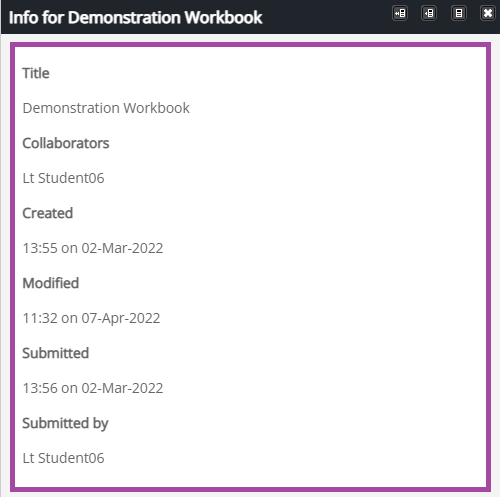
‘I’ icon – with this too, you can display the basic information about a workbook, including the name of the student, and the dates the workbook has been created, modified, or submitted.
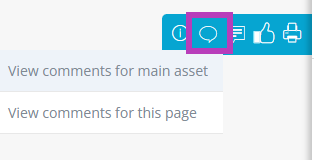
- ‘Comment’ icon – with this tool, you can display and/or add new comments to an entire workbook or to individual pages within it.

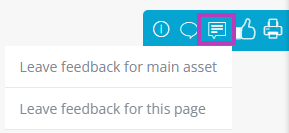
- ‘Feedback’ icon – with this tool, you can display and/or add new feedback to an entire workbook or to individual pages within it.

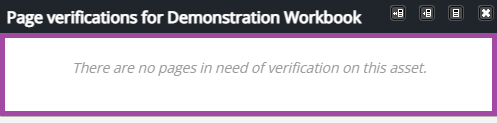
‘Page verification’ icon – with this icon, you can verify individual pages within a workbook which means that you could permanently lock the pages, and prevent the authors from editing. Please note that you would need to mark them for the verification process, which you can do during the time of creating workbooks.

‘Print’ icon – with this icon, you can download the workbook as a printable pdf document.
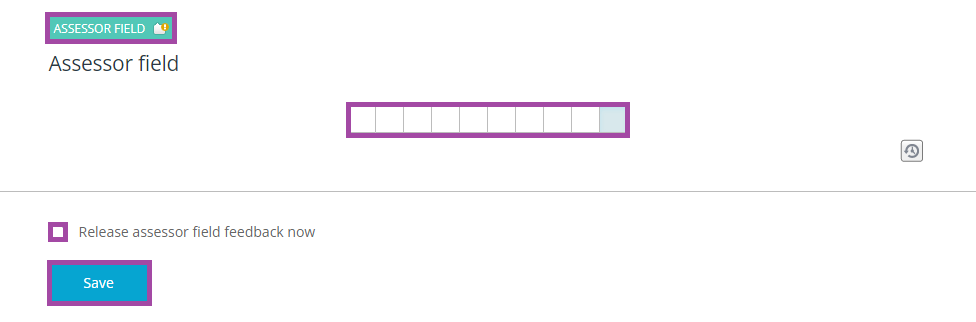
- You can also add feedback by creating assessor fields within a workbook. Once you have added your feedback to these areas, please make sure you tick the box where it says ‘Release assessor field feedback now’ and then click on the ‘Save changes’ button on each individual page which appears at the bottom of the workbook as otherwise, the process is not going to be saved.
How to release feedback to the students
To remove or move the student submissions to a new workspace, please follow the steps below:
- Return to Atlas (Blue ball) > Select the Workspace you have just been marking > Student Submissions.
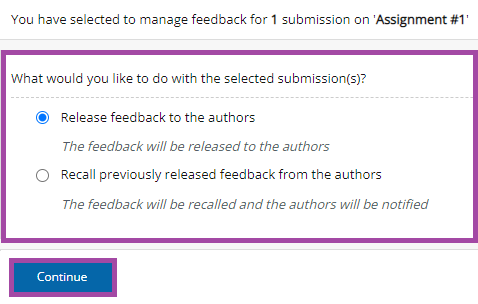
- Once you have the list of the student submissions, you would need to select at least one of them or all of them (if you would like to) to be able to release the added feedback to the students in a PebblePad (ATLAS) workspace. You would need to tick the boxes next to them.

- After that, you would need to click on the ‘Manage feedback’ button.

- You will be directed to a new page where you can select between the following options:
- you can release it to the authors (students), or
- recall the previously released feedback from the authors for example, by specifying a date.
Please make sure you click on the ‘Continue’ button once you have selected an option.
How to remove or move the student submissions to a new workspace
To remove or move the student submissions to a new workspace, please follow the steps below:
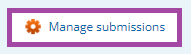
- Once you have the list of the student submissions, you would need to select at least one of them or all of them (if you would like to) to be able to remove them from the PebblePad (ATLAS) workspace or move them to another one. You would need to tick the boxes next to them.
- After that, you would need to click on the ‘Manage submissions’ button.
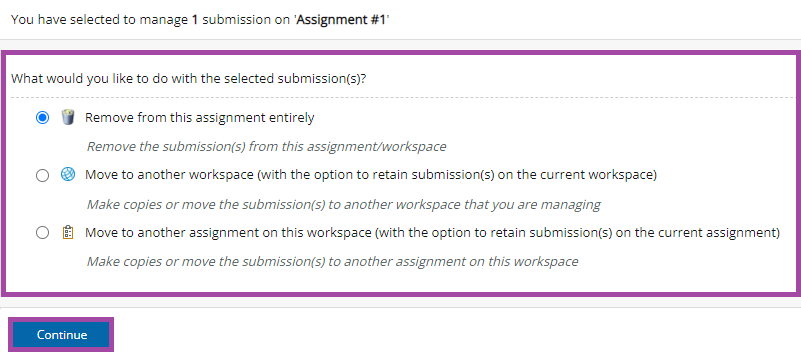
- You will be directed to a new page where you can select between the following options:
- you can remove it completely,
- move it to another assignment within the same PebblePad (ATLAS) workspace, or
- move it to a different workspace.
Please make sure you click on the ‘Continue’ button once you have selected an option. Depending on your choice, you might see a warning message (for example, if you would like to remove it) or you might need to select another assignment/workspace where you would like to move the workbook to.
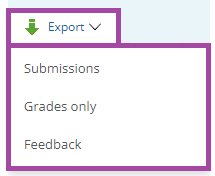
How to export the student submissions
To export the student submissions, please follow the steps below:
- Once you have the list of the student submissions, you would need to select at least one of them or all of them (if you would like to) to be able to export them from a PebblePad (ATLAS) workspace. You would need to tick the boxes next to them.
- After that, you would need to click on the ‘Export’ button and select between the options you would like to download which can be:
- the submissions,
- the given grades, or
- the added feedback.
Depending on your choice, you will be able to define the exact information that should be downloaded.