Overview
PebblePad allows you to create workbooks or e-portfolios for the students so they can shape and develop their skill sets, while PebblePad (ATLAS) is developed as an institutional space to support learning activities such as PebblePad resources which are organised into workspaces.
Just like in the DLE, you could create sets (groups) for marking allocation or for example, for group submissions.
In this article, we will show how to create sets in a PebblePad (ATLAS) workspace.
How to create sets in a PebblePad (ATLAS) workspace
To create sets in a PebblePad (ATLAS) workspace, please follow the steps below:
- Sign in to your Moodle account.
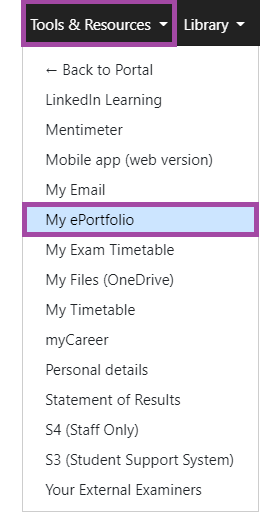
- You will see a navigation bar appearing on the top left side of the screen. Click on ‘Tools and Resources’ and then select ‘My e-portfolio’ from the drop-down menu.
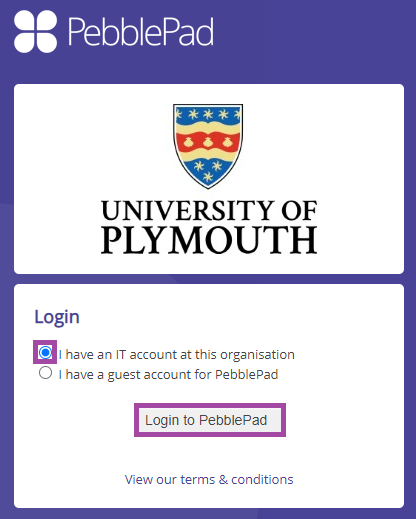
- You will be directed to the PebblePad website where you need to log in with your academic IT account.
- You will see a navigation bar appearing on the top left side of your screen. Click on the blue ball icon to be directed to PebblePad (ATLAS).

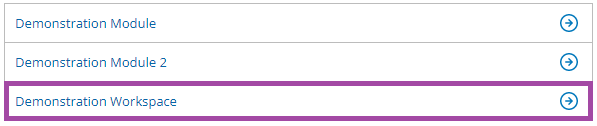
- Once you are in there, you will see the list of the workspaces you have access to. Please select one where you would like to add external users.
6. Please click on the ‘Management’ menu and then select the ‘Sets’ sub-menu in the navigation bar.

- A new page will open with the following options.

Settings
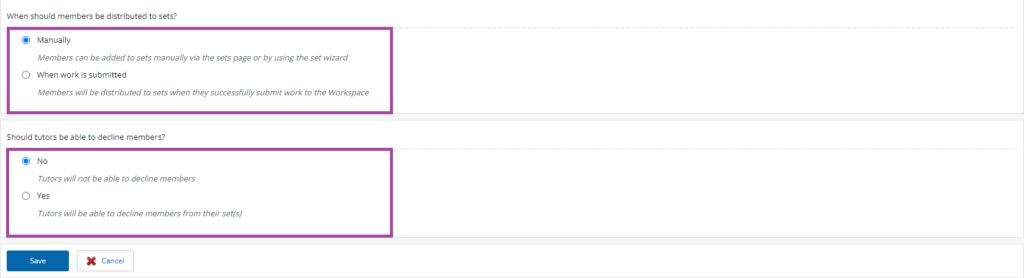
- ‘Settings’ – with this button, you can personalise whether the members should be distributed manually or only when their work has been submitted to your workspace. You can also define whether the tutors would be allowed to decline members. We recommend leaving everything on default.
In case you would like to change some of the settings here, please contact Digital Education for further advice.
Remove selected sets
- ‘Remove selected sets’ – with this button, you can remove a set(s) from your workspace.
To do this, please, first, tick the boxes next to the users you wish to remove and then click on the button. The system will ask you for a double-confirmation.

Set wizard
‘Set wizard’ – with this button, you can create a new single or multiple sets, distribute unallocated members of your workspace, or import a list of users to a new or existing set.
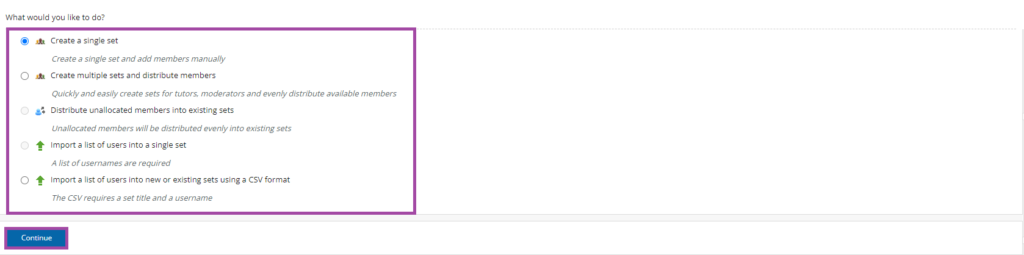
Create a single set
- ‘Create a single set’ – with this option, you can create a single new set in your workspace.
To do this, first, please select the option from the list that will direct you to another page where you will need to enter a title to the set and then click on the ‘Save’ button to finalise your action.

- You will be directed back to the list of sets. Next to each set, you will see the following three listed icons. With the first one (user icon), you can add new users to your set the same way as you would do in the DLE in terms of groups, with the second one (pencil) you can edit its title, while with the last one (bin icon) you can remove it completely from your workspace.

Create multiple sets and distribute members
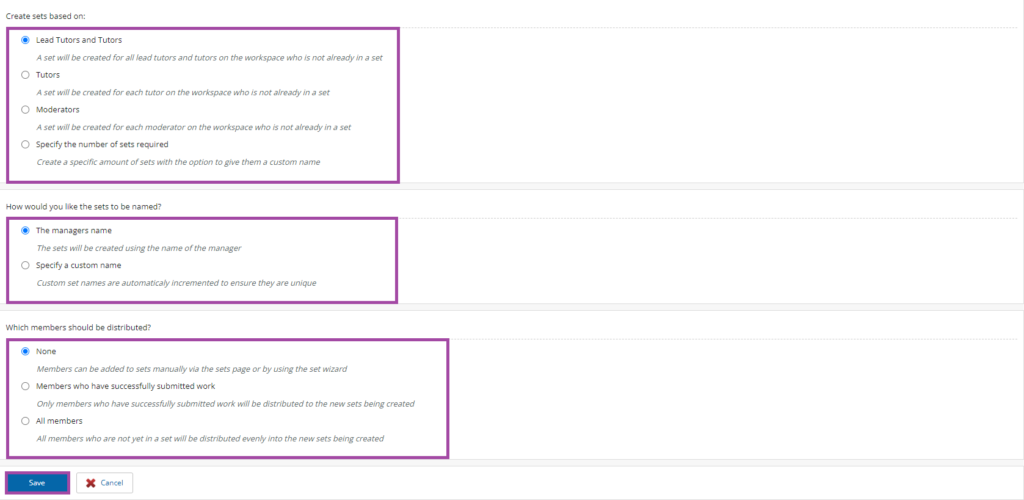
- ‘Create multiple sets and distribute members’ – with this option, you can create multiple sets in your workspace.
To do this, first, please select the option from the list that will direct you to another page where you will need to set up the settings of the sets, such as based on who the sets will be created, how they should be named, and who should be added to them – whether it should be an automatic or manual process.
Please make sure you click on the ‘Save’ button to finalise your action.
- ‘Distribute unallocated members into existing sets’ – with this option, you can allocate the students to sets who have not been distributed yet in your workspace.
To do this, first, please select the option from the list that will direct you to another page where you will need to decide whether only those students should be allocated to sets who have submitted their work or every member of your workspace.
Please make sure you click on the ‘Save’ button to finalise your action.

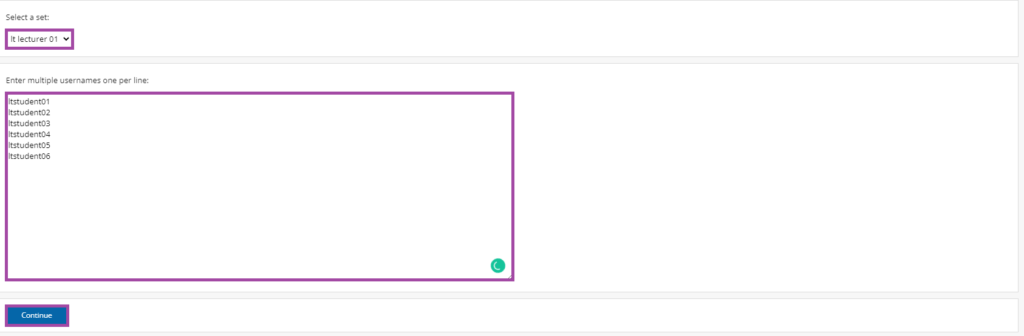
- ‘Import a list of users into a single set’ – with this option, you can import multiple users into a single existing set, even if they have not been added to your workspace yet.
- To do this, first, please select the option from the list that will direct you to another page where you will need to enter the usernames of the users you wish to add.
- Please make sure you separate them per line and you click on the ‘Continue’ button after you have completed the list.
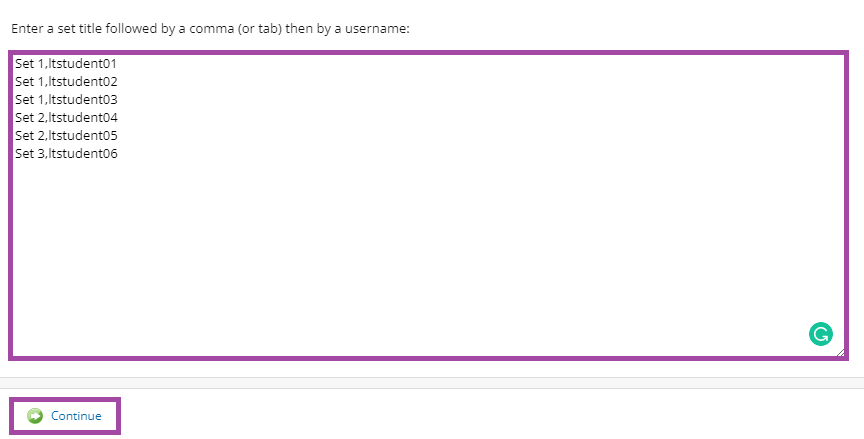
- ‘Import a list of users into new or existing sets using a CSV format’ – with this option, you can import multiple users into multiple new sets, even if they have not been added to your workspace yet. This is very useful for you if you have the list outside of PebblePad (ATLAS), for example, in an Excel spreadsheet.
- To do this, first, please select the option from the list that will direct you to another page where you will need to enter the names of the sets and the usernames of the users you wish to add.
- Please make sure you use the correct format as shown below (also known as CSV format) and you click on the ‘Continue’ button after you have completed your list.
- ‘View/search set membership’ – with this button, you can view or search for a specific person within the sets. This might be useful for you if you have a lot of students and sets as you can filter them by using the search bar.

Screenshot of the list of users that are added to sets and using the search bar (highlighted) to filter them under the dashboard of managing sets in a PebblePad (ATLAS) workspace.](https://digi-ed.uk/support/wp-content/uploads/2022/03/54-1024x243.png)
- ‘View declined members’ – with this button, you can view or search for a specific person who got declined by a manager in your workspace.