Marker allocation
This can be set up if more than one marker is needed for an assignment.
This guide allows you to divide the students cohort so that each tutor marks a selection of the total. These groups can be set up after the students have submitted.
Marker allocation by Group
This section looks at creating groups to aid marker allocation when marking.
To use groups for marker allocations you will already need to have set up groups, if you haven’t already done so, at the course (module) level. To do this follow the steps shown above in the setup groups link.
Linking your marking allocation grouping to your online assignment
- Go to your online assignment and click ‘edit settings’.

- Scroll down to common module settings

- If you’re using groups to define marking allocations you will need to set the ‘Group mode’ field to ‘separate groups’. This will add a filter to the grading table.

- Set the grouping to the correct set of groups where you have previously defined your marking allocations. Do this in the ‘Grouping’ field.

- Back on your DLE module page click the link to your assignment and under name, you will see a drop-down list which allows you to select ‘All participants’ or by Group.

- You can also go into the grading table, by clicking ‘view all submissions’ and select the marking group from the drop-down at top of page.

Manual Marker Allocation
It is also possible to make a manual allocation of markers from within the Grading Table. This method can work adequately for small cohorts, where you wish to allocate markers in an ‘ad hoc’ way, however we do not normally recommend it for normal use, where the ‘group’ method described in previous chapters works better.
Method A – within Grading Table
- Method A – within Grading Table.
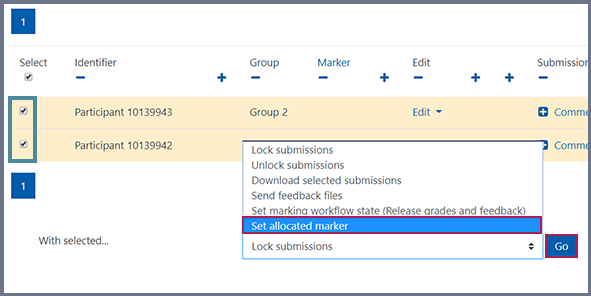
- Select the student(s), which requires an allocated marker and tick the checkbox in first column.
- Once student(s) have been selected, go to dropdown menu below table: With selected…‘ and choose ‘Set allocated marker‘ and then ‘go‘.

Method B – within Grading Window
- Find the student in grading table and click on Blue Grade button.
- In Grade section, find box called ‘Allocated Marker’ and choose the teacher from the drop-down list.

Finding your marking allocations
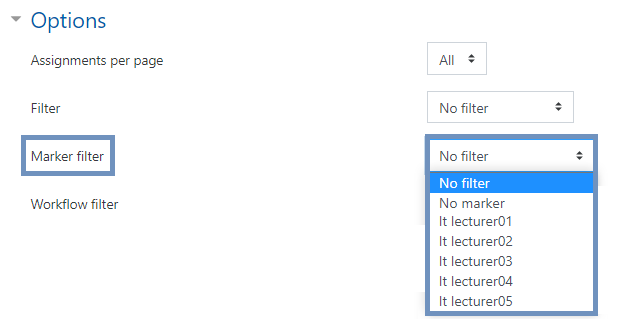
To show your marking allocations, go down to the bottom of the submission list and use the ‘Marker’ filter where you can select your names from the drop-down list.

