Overview
Moodle scales can be used as a grading strategy for student tasks to evaluate or rate their performance. You can either use standard scales or you can also create custom scales which you can then use as a part of your marking process.
Most activities will allow you to use scales, such as ‘Assignment’, ‘Quiz’, ‘Forum’, ‘Glossaries’, and many more.
In this article, we will show you how to create a custom ‘Scale’ in your Moodle course.
How to set up a Scale in your Moodle course
To set up a ‘Scale’ in your Moodle course, please follow the steps below.
How to create a Scale in your Moodle course
Before you would use the scales for an online submission point, you will need to create it first in the ‘Grades’ menu of your Moodle course. To do this, please follow the steps below:
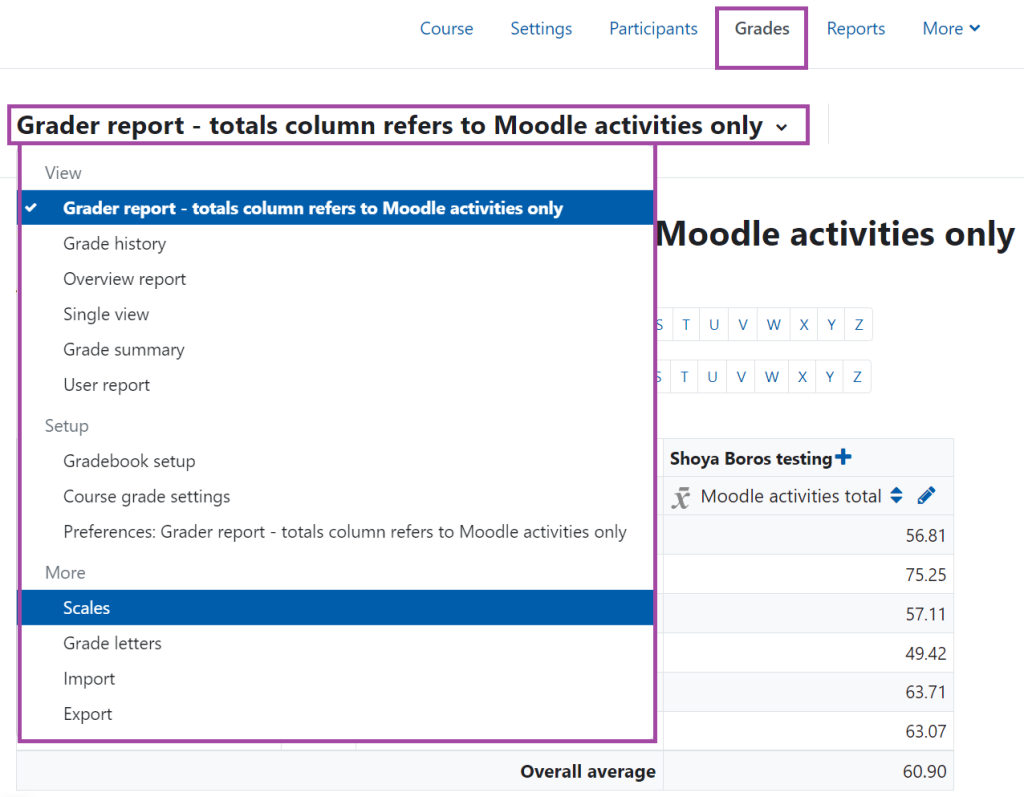
- Please navigate to your Moodle course and then click on the ‘Grades’ menu from the navigation bar. Once you land on the page, you will need to select the ‘Scales’ option from the ‘Grader report…’ drop-down list.

- A new page will open up where you will see the default scales that have been generated by Moodle. To create a new scale, please click on the ‘Add a new scale’ button that appears at the top of the page.
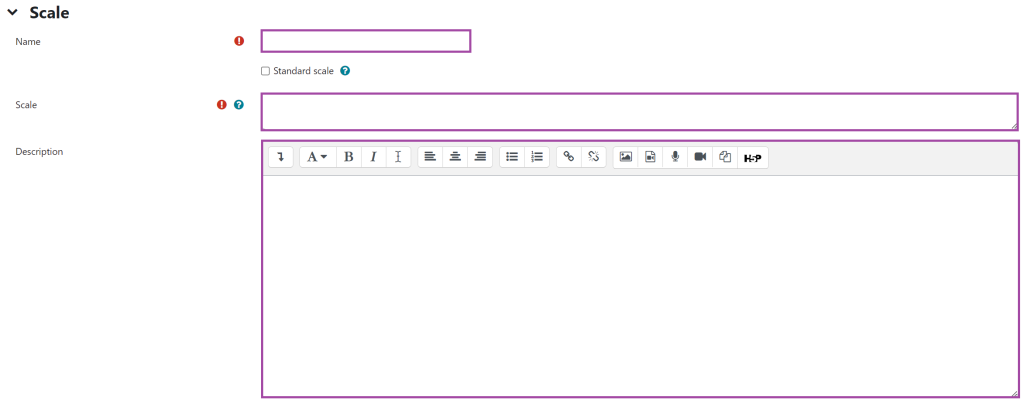
- A new page will open up where you can configure the following settings related to the scale:
- Name
- Scale (this is where you enter your scales by using commas, such as ‘Disappointing, Not very good, Average, Good enough, Very good, Excellent’)
- Description

- Once you have completed setting up the scale, you can then click on the ‘Save changes’ button to finalise your action.
How to add a Scale to an online submission point
To add a ‘Scale’ to an online submission point, please follow the steps below:
- Please navigate to the settings of the ‘Assignment’ activity where you would like to attach and then use the newly created scale. You will need to go to the ‘Grade’ section and then set the ‘Point’ drop-down list to ‘Scale’.

- A new drop-down list will appear in the same window where you will need to select the newly created scale. In this case, it is named the ‘Scale Test’.

- Once you have done this, you will then need to click on the ‘Save and display’ button (bottom of the page) to finalise your action.
How to mark a submission using a Scale
To mark a submission using the newly created scale, please follow the steps below:
- Please navigate to the grading table by clicking on the ‘View all submissions’ button under an ‘Assignment’ activity.
- Once you are in there, please select a student submission that you will need to mark using the newly created scale (blue ‘Grade’ button).

- A new page will open up where you will need to navigate to the ‘Grade’ section and then select the relevant element of the newly created scale from the drop-down list.

- Once you have graded the submission, please click on the ‘Save changes’ button to finalise your action.
To release the grades to all students, please visit the following supporting material.
