Where do I find the Manual Recorder?
Panopto is now installed as standard on all lectern PC’s within teaching spaces. A link is available on the desktop.
How do I install this on my computer or Laptop?
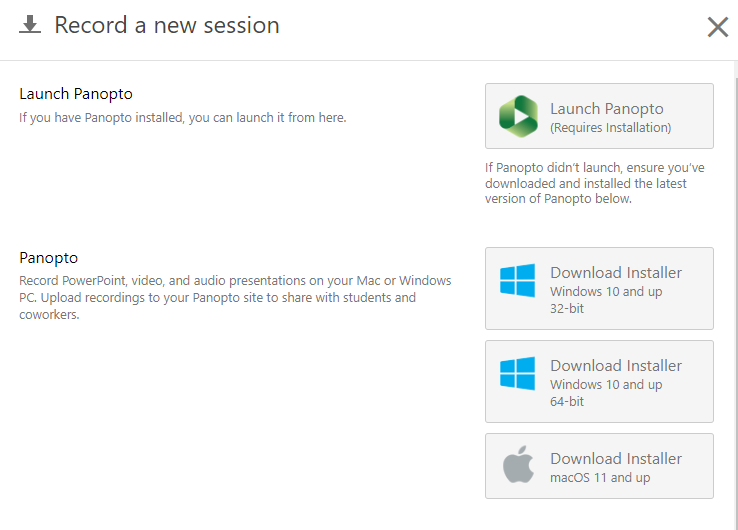
The Panopto Manual Recorder is available to download on all university machines via the software center. Open the software center on the computer you wish to install it on and search for Panopto in the search field. When found click install and follow any steps provided. It is also possible to download the remote recorder direct from the Panopto cloud (https://plymouth.cloud.panopto.eu).
The download options will be located under the blue ‘Create’ button near the top left of the screen. Select ‘Panopto for Windows’ and then choose the correct installer for you.
Step-by-step instructions can be found in this article on how to install Panopto for windows.
Access to folders
By default you will have access to a personal folder via the manual recorder, you will also have access to any DLE modules that have been provisioned where you are registered as a teacher.
Getting Started with the Manual Recorder
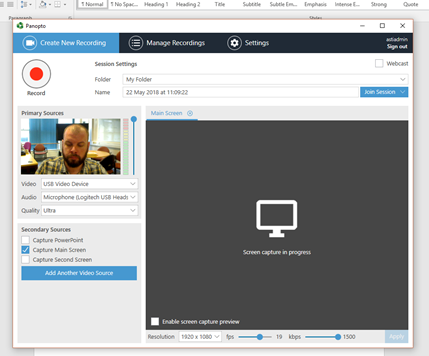
Below is the Manual Recorder – The easier way to set up a recording is to break it down into the following steps:
- Session Settings
- Primary Sources
- Secondary Sources
- Start Recording
Session Settings

The first area is the session settings, here you can select the folder where the recording will be stored [1], clicking on the arrow to the right will open a drop down list of all the folders you have access to. In these settings you can also give the video a title (by default Panopto gives each new session a timestamp) by clicking in the text field [2].
Should you wish to Webcast your video (broadcast your video live) you can do so by clicking on the checkbox here [3] – If you are intending to webcast please refer the ‘Can I use the Manual Record to Webcast session and content?’ section at the end of this guide.
The final option you will see in the session settings is the ‘Join Session‘ button in blue [4], this allows you to record new content on to the end of existing videos – you will need to select the folder that contains the video you wish to add your new recording to. For best results the settings (primary and secondary sources) should match – for example if you have used a webcam in the first video you should also have that selected in your new video.
Courses can then be filtered by ‘Starred’. Alternatively, for starred courses. the ‘Starred courses block’ may be added to the dashboard.
Primary Sources
The Primary Sources section allows you to select you video and audio sources – while selecting a webcam is optional your video must have audio. If you are using a laptop the webcam and built in microphone will be selected by default. If you have a headset or separate webcam that you wish to use plug them in before opening Panopto for them to be selectable from the drop down menus [5][6]. The Quality setting [7] refers to the quality that the webcam will record at, this will be set to standard by default but can be changed to ultra for better results.
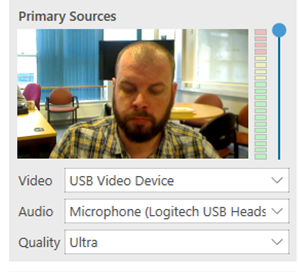
The traffic light coloured bar and blue line [8] allows you to test and adjust the volume of the audio being captured through the selected microphone.
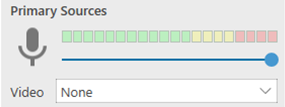
Speaking a few sentences will cause the bar to full with colour, as a good rule of thumb you want the bar to full as much of the green as possible without filling to red section. If you find it is hitting the red all the time dragging the blue dot down will lower the volume.
If you select None in the video option this audio bar will appear horizontally [9]
Secondary Sources
Secondary sources are what Panopto terms sources other than the audio and video that are capturing the presenter. The 2 main options you will see are Capture PowerPoint [10] (if you have PowerPoint installed) and Capture Main Screen [11], in the picture below you will see the Panopto has recognised that my computer is set up with a second screen so offers that screen as well. Clicking the Add Another Video Source [12] will open a drop down menu allowing you to select any additional video sources (webcam, visualizers etc.) that you may have plugged in.

When selecting your secondary sources you need to think about what you are planning on doing in the video.
If for example you intend to talk though a PowerPoint presentation and nothing else you would just need to select the Capture PowerPoint [10], whereas a presentation where you were also going to demo a piece of software or maybe show something on a webpage would also require the Capture Main Screen [11] to be selected.
Select all the secondary sources required by clicking on the check box next to them.
Once selected the sources required will need to be set up. This can be done through the option displayed in the large dark grey section on the recorder. Along the top you will see written in blue a tab for each source selected [13], click on the text will change the display in the dark grey area to the appropriate display.
In the below example you can see we have the Main Screen tab open in the bottom left corner of the dark grey area you can see a checkbox named enable screen capture preview [14] clicking this will show you a preview of the screen that Panopto will capture – this is help if you have multiple screens.

Underneath this check box (outside of the dark grey box you will see a set of options. Resolution refers to the resolution that the screen will be recorded at, this will match the settings of the computer and should be left the same.
The next 2 options (fps and kbps) refer to the frame rate of the video and are linked (changing one will automatically change the other). As a good rule of thumb if you are intending to use the screen capture function is to raise the fps as high as it will go (which is usual 19) as this will give a smoother final video. Changing these settings will cause the apply button [15] to the right to turn blue. You will need to click this to confirm the changes.
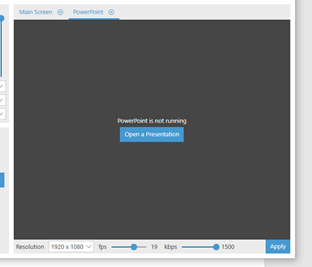
This next section is going to be concerned with setting up a PowerPoint ready to start the recording. I am starting this example without PowerPoint being open.
Firstly I have selected the PowerPoint tab along the top [16] and you can see the Panopto has realised that PowerPoint is not running and has supplied the option to open a presentation [17].
Clicking on this option opens a file finder window that let you locate and select the presentation you wish to use.
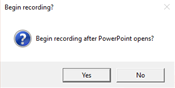
Once you have selected a presentation you will get the following message:
Clicking yes are this point will open the presentation in presenter more and will begin the recording.
From a workflow point of view I find it easier to click no at this point and make sure I have everything ready before I start recording. When I click on the No option the text in the middle changes to the below:
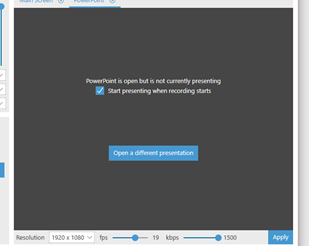
You can see that now rather than saying PowerPoint is not running I have an indication that PowerPoint is open but not presenting [18], under which I have checked the option to start presenting when the recording starts – this means that when I am ready to begin I can press the record button and the PowerPoint will launch the presentation in presenter mode automatically. Not checking this will require you to manually start the presentation after you start the recording
There is also the option to change the presentation if needed. [19]
Beginning a Recording
With our session settings, primary and secondary sources selected and setup we can now begin the recording. To do this click the red record button. At this point if in the image above the start presenting when recording start is checked the presentation will appear and you can begin presenting. If you haven’t selected this option the record button will be replaced with pause and stop buttons along with a timer to show the current length of the recording. At this point you can minimise the record and begin presenting as planned.

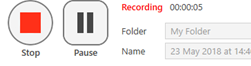
Stopping a Recording
When you have finished you recording you will need to hit the stop button, this will finalise the recording. And you will be presented with a confirmation screen.
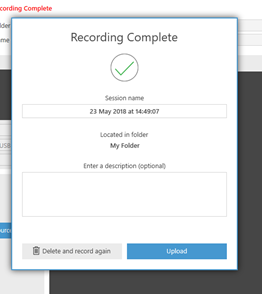
At this point you can change the name of the video and if you wish add a description if you wish.
The other options are to delete and record again – this will remove the recording from your computer and return you to the recorder to begin again.
And finally the Upload option, which is where the video you have recorded will be uploaded to the Panopto folder you have selected. Clicking this will take to the Manage Recording page.
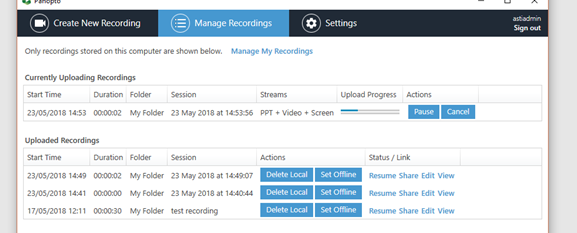
Manual Recording Page
When you click on Upload you will be taken to the Manage Recordings page automatically (you can access this at any time by clicking of the Manage Recordings tab at the top of the recorder) you will see the new created video being processed where it is uploaded to cloud and prepared to editing/viewing. The amount of time this will take is dependent on the length of the video and our internet connection.
You are also able to see any previous recording you upload and their current status.
Clicking on the Manage My Recording will take you to the Panopto cloud.
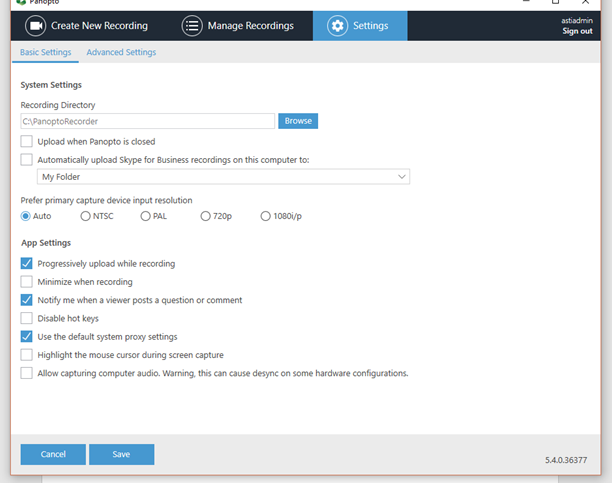
Settings
The settings page can be accessed via the settings tab along the top of the page.
There are a few settings that you may wish to change for better results and better usability.
In the basic settings page shown below, you can chose to progressively upload content while recording [21] means less time is needed after you finish the video to upload the content. This is help if you are making long videos. Any changes made will need to be saved [26].
Minimize when recording [22]: while automatically minimize the recorder when you press the record button.
Disable Hotkeys [23]: it is possible to use the F8/9/10 keys on the keyboard to start, pause and stop the recording while you have the Panopto recorder open, choosing to disable the hot keys is when making software demos where those keys may also be needed by the software being demonstrated.
Highlight mouse capture during Screen Capture [24]: This adds a yellow circle around the cursor making it easier for the viewer to track while watching.
Allow Capture of Computer Audio [25]: By default Panopto will not capture sound from the computer, this could be audio from a video you are showing of audio cues from a piece of software or website you are showing – checking this box allows for the capture of these sounds.
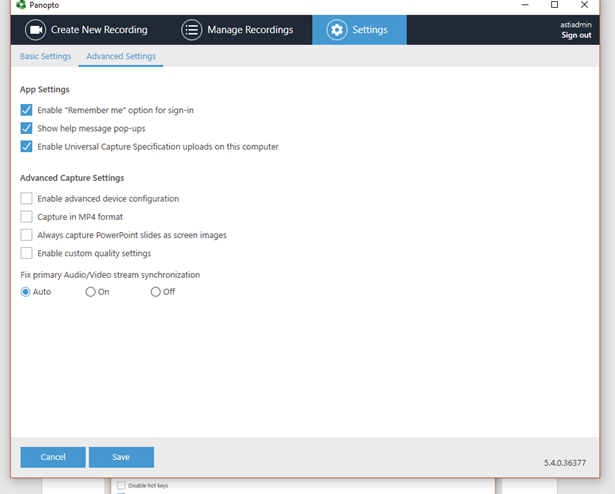
The advance section on the settings can be accessed via the advanced settings tab at the top of the settings.
Most can and should remain as they are, but the Capture in MP4 [27] format maybe helpful if you are planning to use the content outside of the DLE or University systems – for example if you wanted to make the videos public available of a system or service such as YouTube.